Minikube is a popular tool for running Kubernetes locally, and with the power of WSL2 (Windows Subsystem for Linux 2), you can set up a lightweight Kubernetes cluster on your Windows machine. This guide will walk you through the process of installing Minikube on WSL2.
How to Install Minikube on WSL2: A Step-by-Step Guide
Author: LazyDom Date: 2025-04-27
Step 1: Install Prerequisites
1. Install WSL2
WSL2 is required to run Linux distributions on Windows. To verify if WSL2 is installed, open PowerShell or Command Prompt and run:
wsl --list --verbose
Windows Terminal Output should look like this:

If WSL2 is not installed, follow the Microsoft WSL2 installation guide.
2. Install a Linux Distribution
Choose and install a Linux distribution (e.g., Ubuntu) from the Microsoft Store.
3. Install Docker
Minikube requires Docker to run. Install Docker inside your WSL2 distribution:
sudo apt update
sudo apt install -y docker.io
4. Add Your User to the docker Group
To avoid using sudo with Docker commands, add your user to the docker group:
sudo usermod -aG docker $USER
5. Activate the Group Change
After adding your user to the docker group, activate the change by either:
- Logging out and logging back in, or
- Running the following command:
newgrp docker
6. Verify Docker Access
Ensure Docker is working without requiring sudo:
docker version
7. Install conntrack
Minikube requires the conntrack utility. Install it using:
sudo apt install -y conntrack
8. Install curl if not installed
sudo apt update && sudo apt install -y curl
Step 2: Install Minikube
1. Download Minikube
Download the latest Minikube binary:
curl -LO https://storage.googleapis.com/minikube/releases/latest/minikube-linux-amd64
2. Install Minikube
Move the downloaded binary to a directory in your PATH and make it executable:
sudo install minikube-linux-amd64 /usr/local/bin/minikube
3. Verify Installation
Check if Minikube is installed correctly:
minikube version
Step 3: Start Minikube
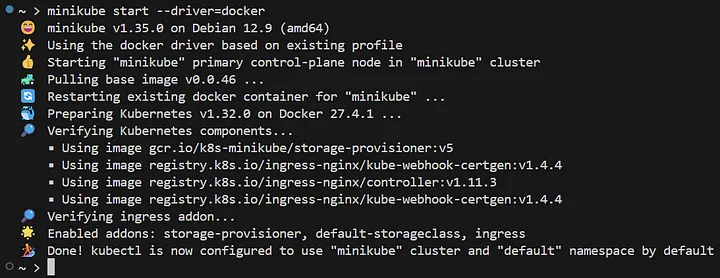
1. Start Minikube with Docker Driver
Run the following command to start Minikube using the Docker driver:
minikube start --driver=docker
Bash Output for the above command:
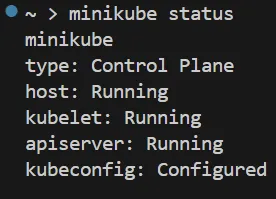
2. Verify Minikube is Running
Check the status of your Minikube cluster:
minikube status
Bash Output for the above command:
Step 4: Manual Installation of kubectl
This guide explains how to manually install the kubectl command-line tool on a Linux system.
Installation Steps
- Download the Latest
kubectlBinary:
curl -LO "https://dl.k8s.io/release/$(curl -L -s https://dl.k8s.io/release/stable.txt)/bin/linux/amd64/kubectl"
- Make the Binary Executable:
chmod +x kubectl
- Move the Binary to a Directory in Your
PATH:
sudo mv kubectl /usr/local/bin/
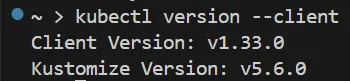
- Verify the Installation:
kubectl version --client
Bash Output for the above command:
Updating kubectl
To update kubectl in the future, repeat the steps above to download and replace the binary with the latest version.
Uninstallation
To uninstall kubectl, simply remove the binary:
sudo rm /usr/local/bin/kubectl
Additional Resources
Conclusion
Congratulations! You now have Minikube running on WSL2. This setup allows you to experiment with Kubernetes locally on your Windows machine. If you encounter any issues during the installation process, feel free to refer to the official documentation or leave a comment below.
For more guides and contributions, visit my GitHub account.
Happy Kubernetes-ing!